0 Lessons from the Construction Site

>> Thursday, January 26, 2012

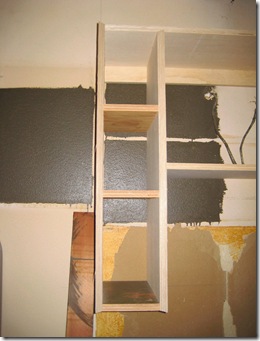
Cabinet Construction: Day 1 was hands down the best day of 2012 so far. Not only was it the first day my broken down kitchen took off on its newfound journey to beauty, but it also brought with it a few self-awareness “ah-ha” moments:

Hold on tight and never let go. When you find a cabinet maker who doesn’t think you are insane (or at least controls his facial expressions enough not to show it if he in fact does think you need to be highly medicated) when you whip out your make believe sketch, you know you’ve found a winner.

image 

Project envy is real. It kills me that I can’t join in on this phase of kitchen remodel, but glad I’m smart enough to leave this one to the pros.

IMG_2148

IMG_2145

IMG_2143

IMG_2146

Time is ticking. While I’m super pumped to check cabinets off of my to-do list, an increasing level of fear is beginning to creep up on me as I inch closer to the knocking-a-big-ole-hole-in-the-wall portion of this revamp. Maybe it’s the mess that awaits—as if my kitchen wasn’t already a mega disaster zone—or maybe it’s the fact that I’ve never taken on a hole punching DIY before, but I’m shakin’ in my work boots over here…don’t worry. I don’t actually have a pair of real work boots. That would just be a bit too far over the line.


imageIMG_2149

clip_image002

Read more...

0 Amateur Hour

>> Wednesday, January 25, 2012

Today the sweet, sweet sounds of cabinet making are pouring out of my kitchen. (That sounded a little dirty and I liked it.) Cue the progress pics!…

Kitchen Demo_21Kitchen Demo_22
Ok, so technically no new cabinetry has been installed yet BUT these demo pics do provide me with the perfect segue into something this blog has been missing all too much lately. An amateur sketch, of course!

Here we go. Prepare yourself for a terrible representation that I am nonetheless still patting myself on the back for of what this chunk of my kitchen will look like when all is said and done…

image 


New cabinetry? A real live microwave? An oven that doesn’t decide on its own what temperature it will cook muffins even though you clearly told it to hang tight at 400 degrees?

Yeah, buddy. Things are looking up.


clip_image002

Read more...

0 Breakin’ It Down

>> Monday, January 23, 2012

Over the past few weeks, with kitchen remodel on the forefront of my mind, my world has consisted of  researching, number crunching, color sampling, and timeline assembling. Enough with the planning already. It’s time to make full use of my favorite dirty little four letter word: demo, baby.

Kitchen Demo_16

IMG_2111


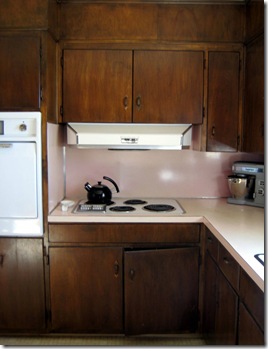
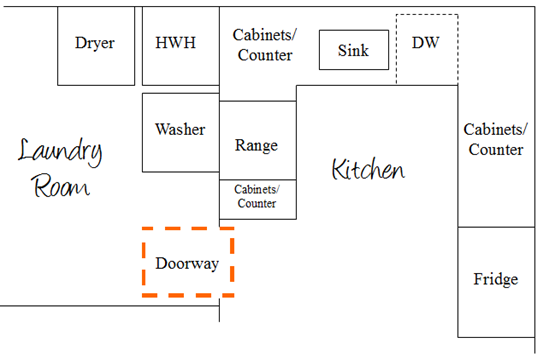
Very fortunately for me, the original boxes of my kitchen cabinets are still in great shape, so most of my cabinets will only have to be refaced with new doors and drawer fronts, eliminating the need for complete gutting. (Can I get a Hallelujah?!) However, since I am planning to create a new entrance connecting the laundry room to the kitchen, the section of cabinetry containing the wall oven/cook top has to be entirely annihilated and reworked to accommodate the new opening.


image
image
Nothing a screwdriver, jigsaw, and hammer couldn’t take care of on a Sunday night…

imageKitchen Demo_13 Kitchen Demo_12

My hand to the home gods, I’ve never seen anything so beautiful.


clip_image002

Read more...

5 Two of these things are not like the others…

>> Thursday, January 19, 2012

Can you spot the differences between the two kitchen mood boards below? I’ll give you a hint: The wall color, backsplash, appliances, lighting and cabinets are still the same…

image


image

If you guessed that I finally forced myself to commit to countertops and cabinet pulls after hours of research and countless bottles of wine, you are 100% correct!

Simply simple brushed nickel pulls from eBay will suit my kitchen just fine…as did the $1.00 a piece price tag.

The countertops were a much more difficult (and much more expensive) decision. I’ve been struggling over the counter dilemma since I dedicated my home loving heart to revamping my kitchen. I knew I wanted a solid surface but was less than enthralled over my choices of granite. Don’t get me wrong, granite is fab for sure, but I wanted color less streaky/spotty/swirly/speckled-y and more uniform. Just the job for quartz.  And who knows? My Silestone quartz counters in Toffee may actually make me want to cook in my new kitchen when all is said and done. Doubtful, but still a possibility.

Woo hoo! Two more decisions checked off the to-do list. Progress, friends. Progress.


clip_image002

Read more...

2 I’ve Seen the Light…

>> Wednesday, January 18, 2012

Like many ranch styles homes of the 1950s & 60s, when my house was built some half a century ago, light fixtures that make you want to pop your eyeballs right out of their sockets were all the rage. Over the past couple of years, I’ve gone room by room plucking the old lighting and bringing in the new, but a couple of eye sores still remained. Like this creature lurking in my hallway…

How to replace a light fixture_8How to replace a light fixture_1

I mean, really? What is that? Whatever it was it was high time it found a new home in the trashcan. Not only was is ugly and clearly missing a part or two, but it hardly put out any light worth mentioning. Since it could only be up from here, a lovely little $12.00 brushed nickel light would be a huge improvement AND it even came with its own light bulb. Definitely my lucky day.

How to replace a light fixture_7

I knew this project wouldn’t be quite as simple as the light fixture change outs I’ve done in the past. Based on my limited knowledge of light fixtures, I could already tell that the electrical box was not flush (enough) with the ceiling to attach the new fixture. In fact, there was no electrical box at all since all of the wiring was housed in the old fixture. So once the old fixture was removed (with power turned off, of course), I attached two pieces of scrap wood to the opening and mounted a new electrical box to the wood with a couple of screws. (Note: This blue electrical box is technically used for wall mount fixtures, but it’s an electrical box nonetheless and would get the job done and house my wires safely…and save me a trip to the hardware store since I already had it laying around. Besides, what fun is a DIY project without a little rigging anyway?)

How to replace a light fixture_3How to replace a light fixture_6

Once the electrical box was secure, I followed the easy breezy instructions and this light fixture swap was a wrap. Much better.

How to replace a light fixture_2

How to replace a light fixture_4

How to replace a light fixture_5


clip_image002

Read more...

1 Kitchen Mood Board

>> Monday, January 16, 2012

One of my absolute favorite parts of any room redesign is putting together a mood board for the space. A designated spot to store all of the ideas that rattle around in my brain. Even though any one mood board I throw together undergoes 1,000+ changes before the room is complete, a mood board is a great way to not only keep track of what I like but also (and most importantly) it’s one of the best ways to see what all of my ideas will look like together. So let’s do it. Here’s my kitchen mood board to date…

image


1. Wall color:
Rice Grain by Sherwin Williams is one of my favorites and was a no brainer choice when it came to my kitchen. A great neutral with the tiniest smidge of green. Love it.

2. Backsplash: White subway tile was the winner from the get-go. It’s tough to go wrong with this one.

3. Appliances: For my kitchen, I need good quality but not over-the-top crazy expensive stainless appliances. Already checked off my my to-list and loading on the delivery truck soon.

4. Lighting: The perfect little brushed nickel pendant light for over the kitchen sink.

5. Cabinets: White shaker cabinets will be shakin’ their way into my kitchen very soon.

6: The unmentionables:…still on the fence with countertops, cabinet hardware and floor tile so more changes to the mood board are on the way!


clip_image002

Read more...

0 Nipping it in the bundt…

>> Friday, January 13, 2012

Taking time this week to slowly clean out my kitchen before I launch into full remodel mode has not only given me the (much needed) chance to get rid of a few cabinet cluttering items but also forced me to realize just how many of those items I’ve never used. Not once…until now. I’ve decided to finally put a few of my neglected kitchen accessories to work. Like this bundt pan. While never utilized it for actual baking, it doubles an en excellent pit stop for old light switches and stray screws ultimately destined for the trashcan after the great outlet/light switch switcheroo is a wrap.

Replace light switch_1

Replace light switch_3

Replace light switch_2


Happy Friday, y’all!

clip_image002

Read more...
Related Posts with Thumbnails

  © Blogger template Simple n' Sweet by Ourblogtemplates.com 2009

Back to TOP