1 Reader Redo: Alex’s Annie Sloan Dresser

>> Thursday, December 6, 2012

Annie Sloan chalk paint is all over the place. If you’ve never heard of it, then you obviously don’t own any hideous hand-me-down furniture that makes you want to loose your lunch every time you look at it. Point blank: Chalk paint makes the un-fabulous fabulous.

Case in point, Alex’s DIY dresser rehab…

The before picture. There’s tons of storage tucked away in this little number, so I don’t blame Alex one bit for wanting to save this little fella.

photo 1

Here we go!…

photo 4

Still going!

photo 1

Puppy thrown in for preciousness and to build anticipation as we anxiously await the ‘after’…

photo 2

Voila! Pretty stinkin’ adorable right? AND I love that she reused the original hardware…

photo 3image


Have a before & after you want to share? Click here to email pics my way and let’s get to celebrating!


Cara Signature

Pin Me
Photo Dec 09, 10 55 43 AM

Read more...

2 A case of the nitpickies

>> Tuesday, December 4, 2012

It’s the little things that drive you crazy about a DIY project. The big, instant gratification stuff (like knocking holes in walls and painting) is the fun stuff. It’s the little nitpicky items on the DIY to-do list that eat at you and it just so happens I have not one but FOUR of those nitpickies waiting on me in this section of my kitchen…

IMG_6134

Nitpicky #1…peeling primer where I primed the windowsill and never painted.

IMG_6124

Nitpicky #2…missing trim.

IMG_6126

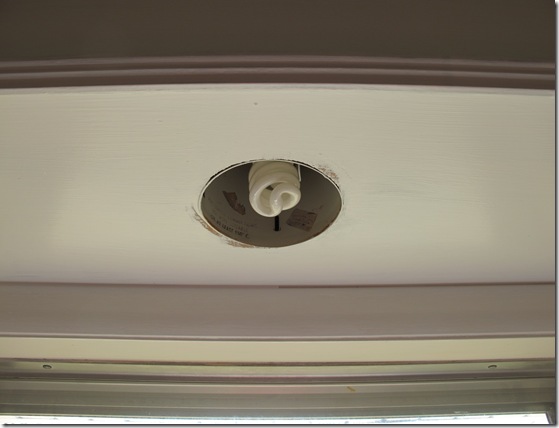
Nitpicky #3…add trim for the can light above the sink.

IMG_6127

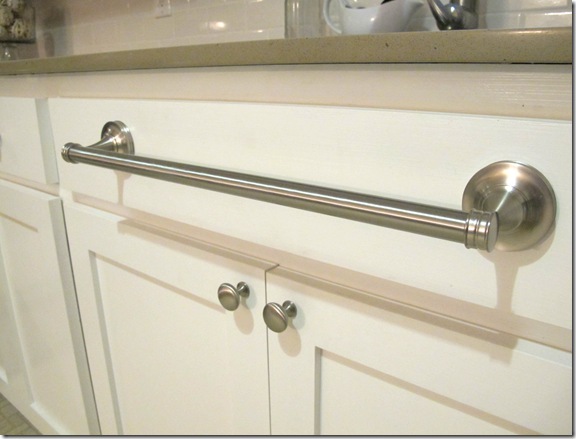
Nitpicky #4…add a towel bar on the faux drawer below the sink so that dishtowels can dangle in their proper place instead of piling by the sink.

IMG_6140

Fortunately with a quick trip to good ‘ol Home Depot for a $20 18” towel bar, this nitcpicky is forever scratched off the driving-Cara-crazy list…

IMG_6158IMG_6157IMG_6148

Cara Signature


Pin Me
Photo Dec 09, 11 02 59 AM

Read more...

2 Door Install Date Night

>> Monday, December 3, 2012

This weekend Michael and I celebrated the one year mark since our first date and also one month of living under the same roof, so of course we had to celebrate. What better way to honor the occasion than with dinner, a bottle of wine and a two-man DIY project? Nothing says ‘Happy Anniversary’ to my heart like ripping out a 50 year old laundry room door and installing a brand spanking new one.

With the laundry room reno underway and the hot water heater relocated to allow a future doorway connecting the kitchen to the laundry room, the next to-do on the list was to install new exterior doors to the laundry room.

Note: Don’t psych yourself up for sweet step-by-step how-to pictures since the majority of this DIY was spent making sure the door didn’t fall and smash one of us which doesn’t lend itself well to snapping progress pics.

This sad little door was well past its prime and the first step was to remove the door from its hinges and tear out the entire frame with our exceptional crowbar technique.

Laundry Before_10

(This is where I would normally insert a demo pic, but Michael and I must have been more concerned about keeping the soles of our feet free of rusty nails.)

Next, we were off to pick up three new exterior doors. Two for the laundry room and one for the kitchen entrance from the carport.

Photo Dec 01, 2 10 40 PMIMG_6144
The good news is we only had one hiccup with this install. The pre-fab trim around the new door frame was one inch too wide to fit in the demo-ed opening.

image

Using our trusty crowbar, we carefully removed the trim so that the door would fit.


IMG_6147

Once the door was in place, we literally just followed the directions included with the door to secure it into place.

s

We still have to fill the small gaps around the frame with insulation and finish out with trim and paint, but how’s that for romance? A safe and secure laundry room door for two.


Cara Signature

Read more...

0 At Home in Arkansas: Wintertime Weekend Warrior

>> Wednesday, November 28, 2012

image


Think cold weather can keep you from your weekend DIY projects? Today, our resident DIY guru, Cara Wilkerson of Live the Home Life, shares a few ways you can be a Wintertime Weekend Warrior!


When the days are shorter and the lack of daylight paired with colder temps force us to spend more time inside, why not put your indoor time to good use with a few simple home projects?…click here for full post


athome_1


Cara Signature

Read more...

0 Winner Winner Mini Makeover Winner

>> Monday, November 26, 2012

Congratulations to Alex who was voted as the winner of the Ace Hardware Mini Makeover giveaway! Alex’s self-proclaimed ‘party hut’ is eagerly awaiting a mini makeover to transform this outdoor space into something ridiculously fabulous. I can’t wait to see what she has up her sleeve!

Alex_Party Hut


A big THANK YOU to all who entered and congratulations, Alex!

Cara Signature

Read more...

10 Rehabbing a Rehab

>> Tuesday, November 20, 2012

Just because I’ve practically filled every nook of my house with furniture flips does not by any means mean the Rehabilitation Station is able to take a breather. Oh no. We’ll just start over from the beginning.

One of my very first rehab projects to make its way onto this blog over three years ago…yikes, three years…was this dresser that with new paint and hardware became a TV console table.

(Insert lovely blurry picture that this blogger is ashamed to have as her only before photo).

imageTV Stand 053

Once I picked up and moved into my lovely little construction site I still call home, this guy landed in my master bedroom, where he’s been hiding safely from screwdrivers and paint brushes ever since…

IMG_4222

Until now. I flat out got tired of looking at those knobs.

IMG_4225

Which knobs? These knobs.

IMG_6052


At some point I must have though they would do, but now I reserve the right to change my mind.

I found a pair of baskets at Hobby Lobby that would slide just perfectly into two of the three top shelves…

IMG_6047

And a few shabby chic knobs to pretty them up a little..

IMG_6050

Put the two together by simply poking the knob screws through the basket and securing on the other side…

IMG_6051

…and we’re in business.

IMG_6095

Then I quickly changed out the fugly knobs that were driving me nuts for matching pretties…


IMG_6096

And this rehabbed rehab was a wrap!

IMG_6088IMG_6099IMG_6093IMG_6105


Cara Signature

Read more...

0 Battle of the DIY-ers

>> Monday, November 19, 2012


Voting has officially begun for the Ace Hardware $100 mini makeover! We received some great entries and I for one can’t hardly stand to wait to find out who the winner will be. Take a look at the rooms below and head over to Facebook to cast your LIKE for the room you want to see snag the $100 gift card to Ace Hardware…

image
Autumn_guest room

image
Jennifer_patio

image
Alex_Party Hut

image
Ragan_kitchen

image
Jessica_office

image
Meredith_sunroom

image
Brandi_bathroom

Ace Hardware

Also, don’t forget to enter to win a

$10,000 Room Makeover by Ace Hardware’s design experts in their

“Merry Paint Makeover” design contest. Click here to head over to Ace’s Facebook page to enter. Good luck!


Cara Signature

Read more...
Related Posts with Thumbnails

  © Blogger template Simple n' Sweet by Ourblogtemplates.com 2009

Back to TOP