4 Queen of the Mountain
>> Tuesday, April 24, 2012

It’s good to be a gremlin.


I’m super pumped to celebrate the 3 year blogiversary of this little blog of mine! Time flies and with nearly 1000 post written (holy smokes I need to get out more) I love being able to look back on all of my adventures—and misadventures—in living the home life. I have a special birthday blog post in the works for later this week, but in the meantime, I’ll just keep chugging along as usual. After 3 years of DIY, I think we’re all on the same page that when it comes to the home life, things don’t just fix themselves.
Remember the master bath remodel I wrapped up last fall? Not to get too braggy, but it’s pretty stinkin’ fab. DIY floating wood vanity. Linen nook. Pristine, white tile. It’s my heaven…but I have to be honest with you now that we are 3 year old friends: I haven’t once taken a shower in this glistening dream come true of mine. Not once.
When the bathroom was almost a wrap, I whipped up a super cute (and super simple) shower curtain by hemming both ends of a few yards of fabric with a sewing machine and hanging across the top of the shower with a tension rod…


Since the liner would not be nearly as heavy as all of the fabric I used for the curtain, I used a smaller tension rod.

A look-see from the inside…

I guess if my OCD ever gets the best of me and I can’t stand seeing the liner from the outside, I could always install a hook on the inside to hold it back…

But for now, I’m a happy camper. A clean happy camper.

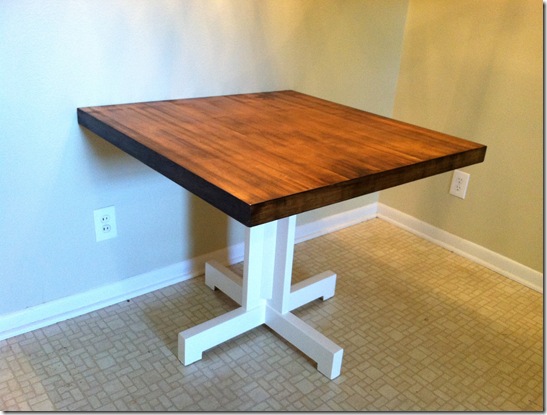
A few months ago, I rehabbed a little breakfast table from this…

Into this…

I absolutely loved him in his newly polished state. He was handsome. He was functional. He was $20 start to finish (click here for more on his stint in rehab). He was perfect…and I thought I had absolutely no room for him in my house. Do I give him away? Do I post on Craigslist? But before I could decide his fate, I kicked off a full blown kitchen remodel. While construction dust was flying, this little table became an integral part of my living room-turned-kitchen setup.

But with my microwave securely mounted in my new kitchen. This table was once again left without a home…until I scooted his little legs into my kitchen and realized that he not only actually fit in my breakfast nook but looked pretty stinkin’ good to boot!
Thus, like most of my projects, a new DIY undertaking jumped right into my lap. I needed chairs. Pronto.
I looked high—thrift stores & yard sales…I looked low—curbside trash piles & questionable warehouses in questionable parts of town…but no chairs. Either too expensive, too beaten up or just too plain ugly. So what does every good DIY-er do when she gets down on her luck? She calls Mom. And what do you know? Mom had a couple of chairs that Dad couldn’t stand to look at for one more second. Score!
Now, some of you are going to curl your lip at the sight of these before photos…

Yes, that is a carved flower on the back…

And yes, that fabric is way too red for my neutral kitchen…

But trust me on this one. Fabric can be changed. So off I went to scout pretty patterns. I hunted stripes. Scoured polka dots. Dug threw piles of geometric prints but nothing felt right. Nothing until this little swatch popped into my line of sight.

I know. Some of you are questioning whether I am 26 or 76 after this pick, but hear me out. There was no getting around that these chairs were already tattooed with a permanent flower across their back (think furniture tramp stamp) and the colors in the fabric were perfect for my kitchen. So why not channel my inner granny and pump up the girly-ness of these twins with a little floral fabric?

They are shabby. They are chic. And while gearing up for a home project packed with sanding and sawing, I feel pretty sitting in them. And whatever it takes to make this girl feel pretty in paint clothes and ponytail is fine by me.
I know this blog has been a little heavy in the yuck department this week (with the moldy banana post and rotting insect carcasses) so let’s dedicate today to focusing on the pretty.
Nothing revs me up for kicking off a home project more than daydreaming of what the final product will look like. Since my soon-to-be-oh-so-fab laundry room will not only serve as place for washing clothes but also as June Bug’s puppy palace, I’ve had a ton of fun with Pinterest and Google Images lately.
Let’s take today to fantasize…
Shelves with baskets will definitely be working their way into the mix…

I feel good about wallpaper in two very specific areas of the house: half baths and laundry rooms. Maybe, I should bring a fun print into my new laundry room—not this print. Definitely a different print…

Love the framed Whirlpool and Tide ads from long, long ago—even though my washer is Maytag and I’m waaaaay too cheap to buy something fancy like Tide.

June loves an ikat print. Like mother like daughter…

But really it doesn’t get any better than this DIY goodness (or just pick one up on Etsy)…

Too cute. June needs one of these personalized puppy canvases from Red Envelope ASAP. I wonder if they can whip one up for a schnauzer-and-some-kind-of-terrier-but-who-really-knows-which-one mix?…
Oh, dear. The wheels are starting to crank and the demo itch is creeping back up on me. I’m determined to finish out this week with zero signs of construction debris, but next week, we’ll talk.
This post is about to get real, y’all. Really real. Normally I’m 100% candid with you on the progress of my house. The good. The bad. The ugly cluttered mess that tends to take over your life when you turn your house into a giant construction site…but there is one room in my house that I hardly ever give you a glimpse of out of pure embarrassment and fear that you’ll leave me for good: my laundry room.
With the actual kitchen portion of my great Kitchen/Laundry Room Remodel of 2012 coming to a close, I have no choice but to share the laundry room before pictures with you. I’m praying it’s been at least an hour since you’ve had lunch. Let’s do this.
Currently in order to enter my laundry room, you have to go out my kitchen door, into the carport and then into a separate door to my laundry room. If you think you’d be able to sneak into the laundry room in a bathrobe, wet hair and face mask without the neighbors catching you, from personal experience I can tell you that your assumption would be incorrect. Hence the need for a doorway connecting the kitchen to the laundry room from the inside of the house. Which is just what I have planned and you’ve seen me describe a hundred times on this very blog…from the viewpoint of the kitchen.

Now let’s take a look at the viewpoint from the laundry room. Here we go. The laundry room in its current state.

What’s that? Not too bad, you say? Let’s dig a little deeper. Aside from the obvious clutter and desperate need for a few gallons of paint, there is just one miserable saggy little shelf serving as the only storage space…

A filthy floor covered in dirt and leaves. Trust me when I say that dropping clean underwear while unloading the dryer is not the highlight of my day.

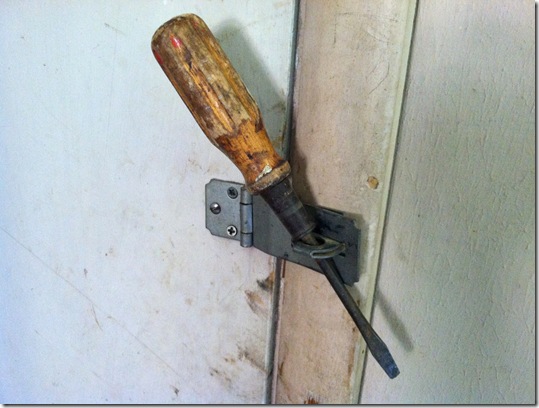
A flathead screwdriver circa 1932 serving as the security system…
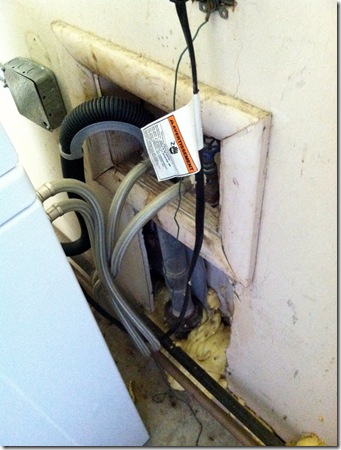
A tangle of water hoses & electrical cords topped off with a sweet DIY foam insulation hack job…
And a family of spiders that don’t know how to throw away leftovers.

Now what was that you were saying?






© Blogger template Simple n' Sweet by Ourblogtemplates.com 2009
Back to TOP