1 It’s a grout party…and you’re invited!

>> Tuesday, January 29, 2013

Happy House-iversary to my little construction site! Three years ago, I moved into my 1960s ranch house complete with filthy carpet (that has since been removed to uncover the original hardwoods), a dark and dated kitchen (which has since been lightened and brightened), a terribly leaky master bathroom (that has since been gutted to the studs & remodeled) and a Pepto-Bismol pink guest bathroom…that is still Pepto-Bismol pink.


Technically, yesterday was my 3 year house-iversary but sometimes a girl just gets busy. We’ll count today as the birthday party, and I can think of no better way to celebrate than by grouting the newly tiled kitchen floor. Who’s with me?!

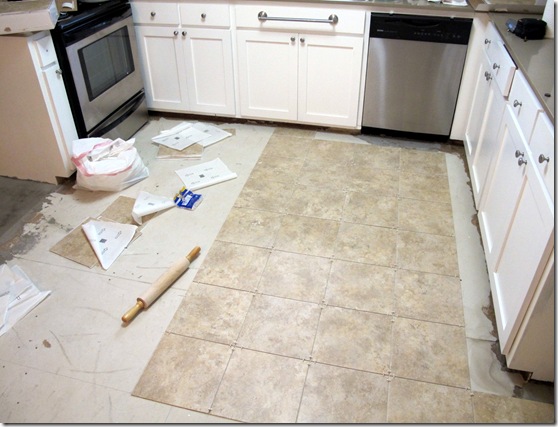
Last I left you on this project, the groutable vinyl tiles were set in place and looking fine. I’m actually super pumped with the way they turned out. If you are looking for a less labor intensive (and less expensive) flooring option, give these guys serious consideration.

Here is an up-close glimpse of the kitchen floor post tile install/pre-grout…

IMG_6395

Now for the tools: Pre-mixed grout (you can mix your own for slightly less money, but I was up for the shortcut), a grout float (more detail on this in a bit), a sponge and bowl of clean water.

IMG_6392

Whoever wrote the instructions on the box of tiles was very insistent that the novice grout applier (ahem, me) not smear grout over the entire tile but only as close to the tile joint as possible.

IMG_6397

They spoke, I listened. Terrified of ruining the new tiles that we’d so carefully placed, I used a 2” margin float for this gig.

IMG_6400

Time to get to work with a little maneuver I like to call the scoop, slap, swipe & scrape.

SCOOP a hearty clump of grout onto the float.

IMG_6403

SLAP the grout on the corner joints.

IMG_6404

SWIPE grout into the joint. I used small diagonal motions to make sure the grout filled the joint without smearing grout all over the tiles.

IMG_6405IMG_6406

SCRAPE the excess grout from the tile. I just held the float at a 90 degree angle and, well, scraped.

IMG_6408

I repeated the process over a few tiles but as the back-of-the-tile-box man told me to, I stopped every few feet or so to remove the excess grout so that it would not dry on the tiles.


IMG_6410

Using a sponge & clean water, I rubbed the tiles in a circular motion to remove the extra grout.

IMG_6411IMG_6412IMG_6419

Once all of the tiles were grouted, I made sure to grout the gaps between the tiles and door trim, since those portions won’t be covered by new quarter round like the edges of the room would be.


IMG_6414

24 hours later, the grout was completely dry. I carefully walked on them well before the 24 hours was up, but furniture and puppy toenails dare not set foot until the grout was completely solid.

IMG_6418

Cara Signature

Pin Me
tile grout

Read more...

1 What Where When Why: Glass Front Fridge-y

>> Friday, January 25, 2013

What: A gorgeous glass front sub-zero refrigerator that my gal pal, Jessica, clued me in on.


Where:  Magazine Land.

When: Just now when I opened the email from Jessica containing such gloriousness…that she sent me on Wednesday. Bad friend.

Why: Clearly fabulous, but I can’t shake the mini-panic attack just thinking about about the half empty Sierra Mist cans and three week old cheese dip containers that would be fully on display in my house. The maid that comes with the fridge must be hiding in the bottom drawer just waiting to realign coke cans and throw out old milk cartons.


Cara Signature

Read more...

1 At Home in Arkansas: How to survive a DIY kitchen remodel

>> Wednesday, January 23, 2013

Happy Hump Day, y’all! If you’re in the mood for a little mid-workday procrastination, head over to At Home in Arkansas Magazine’s blog to check out my guest post. Today I’m recapping the realities of diving into (and living through!) a do-it-yourself kitchen remodel. Enjoy!…

image
image

  Our DIY diva Cara Wilkerson has finally finished her kitchen remodel! Today, she’s giving us a few tips on what to expect when you’re expecting…to begin a kitchen remodel, that is. Follow her story from the beginning by reading her At Home guest blog series here.


At Home_Jan


Cara Signature

Read more...

0 Kitchen Progress: Baby Steps

>> Tuesday, January 22, 2013


Happy Tuesday, blog buddies! Nothing terribly interesting is happen around the old construction site other than the eternal saga of piecing my kitchen back together after knocking an enormous hole in the wall.

IMG_6291
Just a few door hanging, drywall patching, trim nailing and paint priming steps later, we’re inching our way to the finish line.

Photo Jan 20, 7 14 59 PM 
Cara Signature

Read more...

8 The Return of the Brown Thumb

>> Thursday, January 17, 2013

It’s that time of year again. The time of year when I forget how terribly brown my green thumb is and I take off on an I-can-grow-this tangent. Maybe I’m needing a new project? Maybe it’s that I’m itching for springtime temps?….or maybe it’s the precious little package that arrived on my doorstep from my friends in the gardening blog world?

IMG_6323

Two amaryllis bulbs (I only knew what they were after I read the label) perfectly packaged and ready for planting.

sIMG_6327

Luckily, I had two white ceramic thrift shop pots on hand to house my newest friends.

IMG_6333IMG_6334

While step-by-step instructions on how to plant, water and care for these little babies may seem excessive to some, to my fellow lack-luster gardeners and myself, they are much appreciated.


IMG_6331IMG_6336IMG_6343IMG_6344

We’ll see what happens over the next few weeks with these guys, but in the meantime, I have a precious new little basket to play with.

IMG_6338IMG_6340

Want to join in on all of the bulb planting fun? Click here to pick up and amaryllis or two for yourself!

Cara Signature

Read more...

2 This & That

>> Tuesday, January 15, 2013

THIS is the laundry room door right after Michael and I finished the install…

IMG_6319

THAT is a photo of the stripped screws that almost screwed us…and evidence of the first major DIY freak out we’ve had as a couple.

IMG_6322

Cara Signature

Read more...

0 Cut to the Chase

>> Thursday, January 10, 2013

Demo? Check. Floor prep? Check, check! Once we finally began laying the tile, we kicked this floor rehab into high gear.

IMG_6310

The best part of any DIY project is that moment where you are far enough along where you can finally see what the final product will look like. After a ton of it-looks-SO-goods and a few why-didn’t-we-do-this-sooners, we started to realize that our days of laying perfectly square whole tiles was about to be substituted for the tedious task of cutting individual tiles to fit every edge and corner.

One big reason we chose the groutable vinyl tiles was because we would be able to cut the tricky pieces with a few runs of the jig saw…and jig we did, or jig he did, I should say. I measured, he cut. I thought the poor boyfriend’s hand was permanently attached to that stinkin’ saw after all the tiles were cut.

IMG_6311

After hours of measuring, peeling, sticking, rolling, measuring, & cutting, the last little tile found its home.

IMG_6312IMG_6315

Next up? Grout…but by this point in the game, a hamburger and glass of wine was looking like more fun.


Cara Signature

Read more...
Related Posts with Thumbnails

  © Blogger template Simple n' Sweet by Ourblogtemplates.com 2009

Back to TOP